Esta é unha revisión antiga do documento!
Crear una plantilla
Introducción
Una template es una configuración reutilizable de una máquina virtual. Más concretamente es una imagen de disco virtual que contiene un sistema operativo ya instalado y configurado. Los usuarios pueden crear templates a partir de una máquina virtual, a partir del snapshot de un disco y a partir de VHD de otros sistemas. Las templates pueden ser públicas o privadas. Como su propio nombre indica una template privada sólo puede ser vista y utilizada por el usuario que la creó, mientras que las públicas pueden ser vistas y usadas por todos los usuarios.
Crear templates
A partir de una VM preexistente
El punto de partida es una máquina virtual ya creada y configurada para que sirva de prototipo. Tiene que estar parada.
Ahora hay que seleccionar su “root disk”. Hay dos maneras de hacerlo:
- Seleccionar la VM de entre la lista de instancias y hacer click en el botón “View volumes”.
- En la categoría “storage” seleccionar de la lista el volumen correspondiente a la VM.
Una vez tenemos el volumen seleccionado tenemos cuatro opciones disponibles:

La que nos interesa es la última, “Create template”.
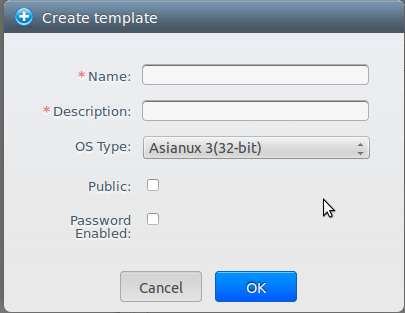
- Name and description: Se mostraran en la interfaz, así que es recomendable poner algo descriptivo.
- OS Type: el sistema operativo instalado en la plantilla. Si aparece en la lista se selecciona. En caso de que no aparezca escoger “Other”.
- Public. Marcar si se quiere que sea pública.
- Password Enabled: marcar si la máquina virtual tiene instalado el script de CS de reseteo de contreña (por defecto no).
Hacer click en “OK” para terminar y que la template esté disponible.
A partir de un snapshot
El procedimiento es idéntico al caso anterior excepto que no es necesario que la máquina esté parada.
A partir de un vhd
Hay que subir el archivo a CloudStack mediante HTTP, por lo que es necesaria una URL.
Hay que seleccionar la categoría “Templates” de la columna izquierda y luego pulsar el botón “Register template” que está en la esquina superior derecha.

- Elemento de Lista Desordenada
Templates are uploaded based on a URL. HTTP is the supported access protocol. Templates are frequently large files. You can optionally gzip them to decrease upload times. To upload a template:
  In the left navigation bar, click Templates.
  Click Register Template.
  Provide the following:
      Name and Description. These will be shown in the UI, so choose something descriptive.
      URL. The Management Server will download the file from the specified URL, such as http://my.web.server/filename.vhd.gz.
      Zone. Choose the zone where you want the template to be available, or All Zones to make it available throughout CloudStack.
      OS Type: This helps CloudStack and the hypervisor perform certain operations and make assumptions that improve the performance of the guest. Select one of the following:
          If the operating system of the stopped VM is listed, choose it.
          If the OS type of the stopped VM is not listed, choose Other.
          Note
          You should not choose an older version of the OS than the version in the image. For example, choosing CentOS 5.4 to support a CentOS 6.2 image will in general not work. In those cases you should choose Other.
      Hypervisor: The supported hypervisors are listed. Select the desired one.
      Format. The format of the template upload file, such as VHD or OVA.
      Password Enabled. Choose Yes if your template has the CloudStack password change script installed. See Adding Password Management to Your Templates
      Extractable. Choose Yes if the template is available for extraction. If this option is selected, end users can download a full image of a template.
      Public. Choose Yes to make this template accessible to all users of this CloudStack installation. The template will appear in the Community Templates list. See Section 12.5, “Private and Public Templates”.
      Featured. Choose Yes if you would like this template to be more prominent for users to select. The template will appear in the Featured Templates list. Only an administrator can make a template Featured.